Darkroom photography Lesson plan examples
LESSON PLAN EXAMPLE 1
Title of Lesson: Camera 101 (two day lesson)
Teacher: Sarah Pina
School: Centennial High School
Grade Level[s]: 9th – 12th
Date to be Taught: Example lesson plan for a high school darkroom class.
Big Idea that drives Lesson/Unit
- Students will learn the basics to a DSLR camera.
- Understanding a DSLR Camera vs. a SLR Camera.
- Manual vs. Auto settings.
Fine Arts Goals Met by the Objectives:
Vocabulary Acquisition:
Key Artistic Concepts:
Artmaking Materials Needed:
Student Materials:
Contemporary/Historical/Multicultural/Literature exemplars:
PROCEDURES:
Discussion: ( 5 minutes)
Schedule
Title of Lesson: Camera 101 (two day lesson)
Teacher: Sarah Pina
School: Centennial High School
Grade Level[s]: 9th – 12th
Date to be Taught: Example lesson plan for a high school darkroom class.
Big Idea that drives Lesson/Unit
- Students will learn the basics to a DSLR camera.
- Understanding a DSLR Camera vs. a SLR Camera.
- Manual vs. Auto settings.
Fine Arts Goals Met by the Objectives:
- 26.A.3e. Visual Arts: Describe how the choices of tools/technologies and processes are used to create specific effects in the arts.
Vocabulary Acquisition:
- DSLR: Digital Single Lens Reflex Camera (Automatic)
- SLR: Single Lens Reflex Camera (Manual)
- Automatic: (DSLR) Settings can be predetermined by the camera.
- Manual: (SLR) Settings must be altered to successfully take a photography every time.
- All Camera Parts on a Manual Camera:
- Shutter Speed: Shutter speed relates to the duration of time light hits the digital sensor or film
- ISO ( or ASA/film speed): International Standard Organization. It is the indication of sensitivity to light, either film sensitivity or digital sensor sensitivity.
- Shutter Release Button: Used to take the photograph, usually a small circular button on the top right side of the camera body.
- Film Advance Lever: Used to advance the film to the next frame to avoid multiple exposures on one frame. Usually located on the top right of an SLR camera body.
- Frame Counter: Used to know how many frames remain in a roll of film on an SLR camera body, usually located on the top right of the camera.
- Neck Strap Eyelet: Used to attach a neck or wrist strap to a camera, located on both sides of any camera body.
- Hand Grip: A piece of leather like material on the side of the camera body that helps add grip for its user.
- Small Timer Lever: Located on the front of the camera body on the left side most often. Helps add a timer to the camera when taking long exposure photographs.
- Lens Release Button: Used to remove any lens off of a camera body, located near the bottom of the lens on the left side of the camera body.
- Hot Shoe Contact: Located on the center top of a camera body where a flash may be mounted and locked into place for use.
- Film Rewind Crank: Used to rewind the exposed film back into its light-tight canister. Located in the center of a circle on the top left of the camera. Must be turned in the direction of the red arrow, do not use excessive force.
- Film Rewind Knob: Houses the Film Rewind Crank on the top center. When film is rewound, pull the knob up to pop the back of the SLR camera open. To lock the back of the camera, push the button in.
- Film Speed Window: Keep track of ISO settings.
- Aperture Ring: Located on the lens to open the aperture, f-stops, the amount of light that is let in through the hole.
- Focusing Ring: Located on the lens to focus on your subject. Measured in mm, which depends on length of lens.
- Depth of Field: The amount of your photo or photo subjects that are in focus.
- Depth of Field Preview Lever: Located next to the focusing ring.
- Exposure Measurement Button: Indicated the amount of time the shutter is open to let in light for an exposure. Located on the top right of the camera body.
Key Artistic Concepts:
- Understanding Manual vs. Automatic photography.
- Becoming familiar with Single Lens Reflex Cameras and their individual parts.
Artmaking Materials Needed:
Student Materials:
- Notebook, pen/pencil, worksheets.
- Projector, PowerPoint, Web Links, Worksheets, Notes, and SLR Film Cameras.
Contemporary/Historical/Multicultural/Literature exemplars:
- https://rewired.edublogs.org/photography/preliminary-photography/ways-of-seeing-postcard-images/nikon-slr-film-cameras/screen-shot-2014-03-16-at-6-22-09-pm.
- DSLR for dummies: http://www.dummies.com/how-to/content/digital-slr-cameras-photography-for-dummies-cheat-.html
- http://digital-photography-school.com/5-situations-when-manual-focus-is-better-than-auto-focus/
- Show examples of the first SLR Cameras:
PROCEDURES:
Discussion: ( 5 minutes)
Schedule
- Introduce myself to the class.
- Take attendance.
- Pass out worksheets as I explain what we will be covering in class over the next two days.
- Begin intro to SLR Cameras for Darkroom Film Photography.
- At the end of class, simply clean up to continue tomorrow.
- Introduce film photography
- Who has taken a dark room photography class or has experience in photography?
- Pull up PowerPoint to begin term review.
- Pass out worksheets that must be filled in by the class.
- Show the class a physical SLR film camera.
- Demo
- As we review each part of the camera body, show the class where it is located on the actual camera so that they may fill in their worksheet as they take notes.
- Show definitions on the PowerPoint as I say them out loud and point them out on the camera body.
- Show an example of the very first types of SLR film cameras in the PowerPoint.
- Compare SLR cameras to DSLR cameras physically. Let the class pass them both around to understand the differences and similarities during day 2.
- What is the difference between manual and auto in regards to a camera?
- Walk around the classroom during presentation to make sure that all students are engaged in the lecture.
- Answer any questions that may come up as needed, be loud and clear, and make sure that students are filling in their worksheets.
- This information will be reviews within a week in preparation for a secret pop quiz and test.
- CLEAN UP AND CLOSURE: (2-3 minutes)
- Day 1: Allow 2 minutes for wrap up questions and clean-up.
- Day 2: Class will continue today where we left off the previous day.
- Allow students 3 minutes to pass back cameras and clean up their spaces, as well as answering any questions they may have.
- Homework: Assign students the completion of the worksheets about labeling the camera parts and understanding their functions and definitions. Alert them that they will have a test on this information the next week, study.
LESSON PLAN EXAMPLE II
Title of Lesson: Camera 101 Day 3 (Week 1)
Teacher: Sarah Pina
School: X High School
Grade Level[s]: 9th-12th Grades
Date to be Taught: Example lesson plan for a high school darkroom class.
Big Idea that drives Lesson/Unit:
- Students will learn the basics to a DSLR camera.
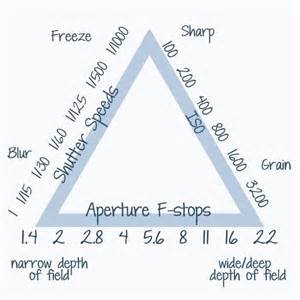
- Understanding the Exposure Triangle.
- The power of Exposure Triangle (Aperature, ISO, and Shutter Speed) in a Digital Camera.
Fine Arts Goals Met by the Objectives:
Vocabulary Acquisition:
Key Artistic Concepts:
Student Materials:
Have an actual worksheet for student to reference and exposure triangle.
PROCEDURES:
Discussion: ( 5 minutes)
Schedule:
Title of Lesson: Camera 101 Day 3 (Week 1)
Teacher: Sarah Pina
School: X High School
Grade Level[s]: 9th-12th Grades
Date to be Taught: Example lesson plan for a high school darkroom class.
Big Idea that drives Lesson/Unit:
- Students will learn the basics to a DSLR camera.
- Understanding the Exposure Triangle.
- The power of Exposure Triangle (Aperature, ISO, and Shutter Speed) in a Digital Camera.
Fine Arts Goals Met by the Objectives:
- 26.A.5 Common for all four arts: Analyze and evaluate how the choice of media, tools, techniques and processes support and influence the communication of ideas.
- 26.A.3e Visual Arts: Describe how the choices of tools/technologies and processes are used to create specific effects in the arts.
Vocabulary Acquisition:
- Aperture: is the unit of measurement that defines the size of the opening in the lens that can be adjusted to control the amount of light reaching the film or digital sensor.
- Shutter Speed: or exposure time is the length of time when the film or digital sensor inside the camera is exposed to light.
- ISO: International Standard Organization. Sensitivity of light for film.
- Exposure triangle: Aperture x Shutter Speed x ISO
- Be able to reference any and all terms that were covered in the first two days of Week 1: Camera parts.
Key Artistic Concepts:
- Understanding the power of Exposure Triangle (Aperature, ISO, and Shutter Speed) in a Digital Camera.
Student Materials:
- Notebook, pen/pencil, and worksheets.
- Projector, PowerPoint, Notes, Worksheets, Web Links, Examples, and Cameras.
Have an actual worksheet for student to reference and exposure triangle.
PROCEDURES:
Discussion: ( 5 minutes)
Schedule:
- Greet the class and take attendance.
- Introduce the topic of exposure triangle.
- Watch a video. Pass out worksheets during video.
- Review PowerPoint to cover exposure triangle.
- End class with reminders, clean up, homework assignment, and answering any questions that students might have.
- DEMONSTRATIONS AND WORK SESSION: ( 50 minutes)
- What is the exposure triangle and how does this affect our photographs and our subjects?
- What is shutter speed?
- Who can tell me what aperture is and how it works?
- What is ISO?
- Understanding the Exposure Triangle
- Show video in the beginning of class.
- Pass out worksheets for completion during video.
- Begin the PowerPoint with examples.
- Go over Aperture, shutter speed, and ISO during PowerPoint again.
- Walk around the classroom while presenting to make sure students are attentive and fulling in their worksheets.
- Any unfinished worksheets will be assigned as homework.
- PowerPoint and understanding terms will take up the entire class period.
- Try to get students to ask questions if anyone seems confused.
- Try to get students to ask questions if anyone seems confused.
- CLEAN UP AND CLOSURE: ( 2-3 minutes)
- Allow students 2-3 minutes for clean-up.
- Collect any cameras that were passed out for demos.
- Answer any wrap up questions that students may have.
- Remind students to study their camera terms for their test.
- Homework: Assign worksheet completion.
LESSON PLAN EXAMPLE III
Title of Lesson: Camera 101 continued (Week 1 Lesson 3)
Teacher: Sarah Pina
School: X High School
Grade Level[s]: 9th-12th Grades
Date to be Taught: Example lesson plan for a high school darkroom class.
Big Idea that drives Lesson/Unit:
- Understanding Manual vs. Automatic Settings on an SLR Camera.
Fine Arts Goals Met by the Objectives:
Vocabulary Acquisition:
Key Artistic Concepts:
Artmaking Materials Needed:
Student Materials:
Contemporary/Historical/Multicultural/Literature exemplars:
PROCEDURES:
Discussion: (5 minutes)
Schedule:
Title of Lesson: Camera 101 continued (Week 1 Lesson 3)
Teacher: Sarah Pina
School: X High School
Grade Level[s]: 9th-12th Grades
Date to be Taught: Example lesson plan for a high school darkroom class.
Big Idea that drives Lesson/Unit:
- Understanding Manual vs. Automatic Settings on an SLR Camera.
Fine Arts Goals Met by the Objectives:
- 26.A.5 Common for all four arts: Analyze and evaluate how the choice of media, tools, techniques and processes support and influence the communication of ideas.
- 26.A.3e Visual Arts: Describe how the choices of tools/technologies and processes are used to create specific effects in the arts.
Vocabulary Acquisition:
- Manual: Settings must be altered to successfully take a photography every time.
- Automatic: (DSLR) Settings can be predetermined by the camera.
- All terms on worksheets from the past 3 days of class for reference during review.
Key Artistic Concepts:
- Manual vs. Automatic
- DSLR vs. SLR
Artmaking Materials Needed:
Student Materials:
- Notebook, pen/pencil, and worksheets.
- Projector, PowerPoint, Web Links, Notes, Worksheets, Examples, and Cameras.
Contemporary/Historical/Multicultural/Literature exemplars:
- Have a DSLR and SLR camera for the class to pass around and compare similarities and differences.
- Worksheets that students filled in during day 1 and 2 should be available for reference during the review of manual settings.
- Show examples of good and bad professional and student photographs made through manual settings, what are the wrong settings (think out of focus examples/noise and in focus/perfect lighting).
PROCEDURES:
Discussion: (5 minutes)
Schedule:
- Greet the class and take attendance.
- Explain what we will be covering in class: review of manual vs. automatic.
- Show professional and student examples.
- Answer any questions as best as possible.
- In class activity.
- Clean-up and Reminders: Study for test the next week
DEMONSTRATIONS AND WORK SESSION: ( 47 minutes)- Manual settings vs. Auto Settings review introduction.
- Ask students to pull out their worksheets from the previous classes.
- Review Manual Settings.
- Review Auto Settings.
- Pass out both an SLR and DSLR cameras so that the class can work with them, mainly the SLR Camera.
- Show examples of both with good and bad photos. “Do’s and Don’ts”.
- Compare each process.
- Discuss situations in which to use which.
- Clarify that we will mainly be working with manual settings with film cameras, but it is important to understand both settings.
- Manual settings vs. Auto Settings review introduction.
- Students will take photos during class to see how the camera settings work on a Digital Camera to be able to understand the effects of choosing your settings vs. letting the camera set predetermined settings.
- Remind students to save these photos for future use in which they will receive a small grade, so they should put some effort in it.
- Walk around the classroom to help students who need help and answer any questions.
- CLEAN UP AND CLOSURE: ( 2-3 minutes)
- Allow 2-3 minutes for clean up.
- Collect all cameras.
- Remind students to save their photographs.
- Answer any questions.
- Homework: Study for test.
- Allow 2-3 minutes for clean up.
